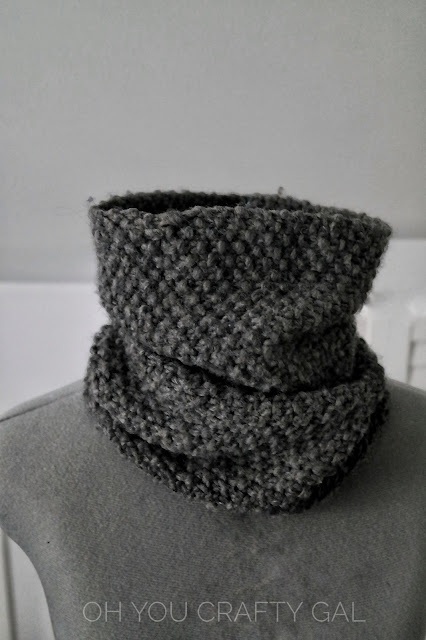
Chelsea Chunky Cowl Free Knitting Pattern
3:10 PMI just started to learn how to knit and decided I wanted to make a cowl. The only problem is I couldn't find a pattern that I liked to use. I wanted it skinny enough to easily fit under my jacket and long enough that I could use it to cover my mouth if it gets really cold (I do live in Minnesota). I also couldn't find a pattern that didn't use circular needles. I don't know how to use circular needles yet, so I chose to join them together instead. You could definitely alter this pattern to be made on circular needles if you wish.

I basically came up with the ideal for this last year, I just didn't know how to knit yet. It makes a great last minute gift since you can finish it in a night.
I just felt like my scarfs last year were a bit too bundled up looking. Let's just say in MN when your happy that it's a warm day because it's in the single digits (yes you heard me right), you feel less than glamourous. All you care about is being warm. But hey it's nice to be cute and warm right?
I used the seed stitch for this pattern because it's not to hard for a newbie like me and it creates a great texture.
The finished cowl measures 14 inches long and 9 and a 1/2 inches long. I would have preferred it to be just a little shorter and wider. Maybe like 12 inches by 11 inches. I think if I had cast on 37 stitches instead of 43 it would have been closer to these dimensions, so I altered the pattern to reflect these changes so the finished dimension of the pattern should be 13 inches by 11 inches.
Are you ready to knit this?
Finished Size: approximently 13 inches x 11 inches
Gauge
4 inches in seed stitch= 10 stitches and 10 Rows
Supplies
- One skein of Patons Classic Wool Roving, approx 120 yards in dark grey, or bulky yarn
- size 13 knitting needles
- Scissors
- darning needle
K - knit
P - purl
Sts - stitches
Instructions:
Cast on 37 sts
Row 1: K1, P1....repeat ending on K
Row 2-until desired length K1, P1....repeat ending on K, (make sure to purl into knits, and knit into purls).
Once reached desired length , bind off and leave a tail about 3 times the length, thread yarn with darning needle and seam with mattress stitch. Wool and the Gang has a great tutorial on invisible seaming with seed (moss) stitch
Weave in ends
Enjoy your new scarf!
http://ohyoucraftygal.blogspot.com ©Oh You Crafty Gal! All rights reserved.
Check out my other free patterns:
Free Twisted Rib Large Mug Cozy Knitting Pattern with Videos


2 comments
I had a heck of a time trying to understand how to make the kitchener stitch work for connecting a live row to a dead row. But aside from that, I'm really pleased with the results of this pattern. I went with the 43 stitch rows since I have a long neck and wanted a cowl that would have a lot of bulk when scrunched up - and that's exactly what I got. What type of cast-on method did you use? Thank-you!
ReplyDeleteI'm still learning the kitchener stitch too. I'm glad you liked my pattern. Believe it or not, this was my very first knitting project ever. And yes I am crazy enough to make up a pattern while learning knitting! I actually liked using the 43 stitches to cast on, the problem was that I came up short with the width of what i wanted and I wanted to make it a one skein pattern. I used the long tail method to cast on, since that's what my teacher taught me to do (I was taking a class while I developed this pattern). Hope this helps!
Delete